Splendid Delights to Sink Your Teeth Into

We are led by our passions for all things born of the past and found in the present.

Sunday, July 11, 2010

Baja Tacos


Baja Taco stands are peppered all over Southern California. Most Southern Californians are health conscious. Cycling, jogging, walking, surfing, hiking, etc., are favorite modes of exercise, so what goes into our bodies is important as well. Our family loves to eat these simple tacos. All you need is a barbecue or not and you are good-to-go.

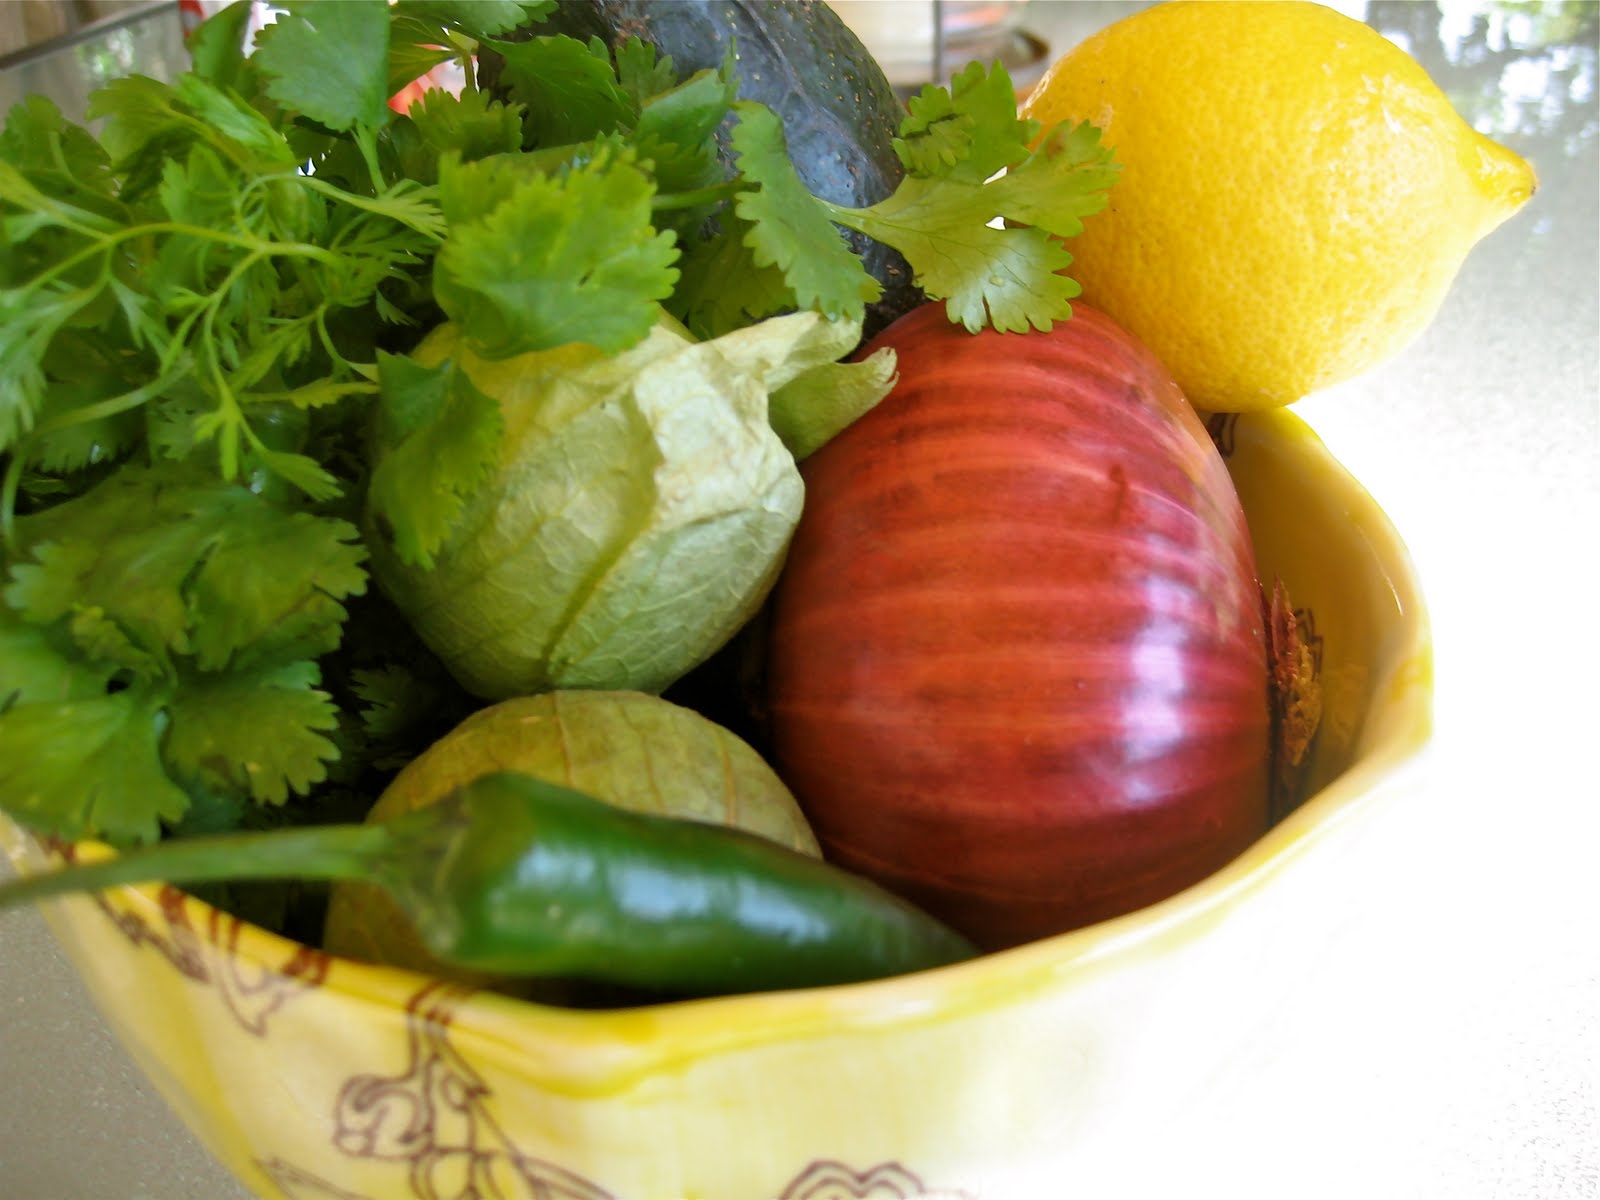
The above ingredients were used to make gucalsa. That's neither guacamole or salsa so I call it gucalsa. Why? Because I've added 2 tomatillo (the ones in the bowl with the papery coverings), and it changes the texture of traditional guacamole. It spoons on tacos easier and adds another flavor dimension. Here's the recipe:

Gualsa
1/2 Serrano chili (use more or less for your taste) remove seeds **careful not to touch your eyes**
Wash your hands thoroughly afterwards. Dice finely.
2 tomatillo, husks removed and cooked in boiling water for 4-5 minutes until tender-not mushy.
2 tablespoons red onion, diced very fine
1 ripe Haas avocado, cut in half, scoop out the insides into a bowl and mash to desired consistency
1/2 teaspoon lemon zest
2 tablespoons lemon juice
2-3 dashes hot sauce (again to your taste)
salt and pepper to taste.
(serves 4)

Remove the top stem from the cooked tomatillo. Place in a blender and puree.
In a medium bowl, add all of the above ingredients. Adjust the seasonings. Cover with plastic wrap until ready to serve.

~Pico Salsa~

3 large red ripe tomatoes
1/2 Serrano chili, seeds removed-seeds are the hottest! Dice finely. (wash those hands well afterwards and don't touch any sensitive areas on your body, ouch!)
Pinch of dried oregano
4 tablespoons red onion, finely minced
3 tablespoons cilantro, leaves only, minced
3 (give or take) dashes Tabasco sauce or hot sauce
2 tablespoons lemon or lime juice
1 tablespoon olive oil
salt and pepper to taste

~Baja Cabbage~

Cabbage is the way it goes down with Baja tacos, otherwise it just isn't a Baja taco.

Ingredients:
Allow 1 handful of cabbage per guest you are serving. For every handful of cabbage add 1 tablespoon of mayo or sour cream and a tablespoon of pico salsa. Stir it to combine all the ingredients. Add a dash of salt and pepper and you are ready to go. Now you can get fancy with shredded carrots, cilantro, etc., but why? Keep it simple!


~Baja Tacos~

Red Snapper fillets, or any fish your family loves to eat
You can add roasted chicken or tri-tip or shrimp. Any simply prepared meat will work. Nothing heavy or fatty though. I also purchased a fully cooked, hot chicken from the market deli to make the prep easier.
corn or flour tortillas
hot sauce
pico salsa
gualsa
Baja cabbage
Lawry's Taco Seasoning
Olive oil

To make the snapper or fish fillets:
Preheat the barbecue.
I use a wire mesh pan, made for barbeque's and found at places like Target, Williams-Sonoma, etc.
I season the fish with salt. I lightly sprinkle with a little olive oil (to keep it from sticking to the pan as it cooks), and a sprinkling of taco seasoning, optional.
Place the wire mesh pan on the hot grill, add the fish and cook (this is the tricky part) until the fish is opaque, but not overcooked turning the fish over part way through the cooking process. Remove from heat and pan and place on the Baja Taco Platter.

~Baja Taco Platter~
I like the grandness of one large platter, laden with all the accouterments. I will have a picture to show you as soon as I photo shop it a little. You see "someone" dug into the food so quickly, I couldn't capture my shot for the blog. It was just a little damage and I should have it up soon. Arrange all the components:
Pico
Gualsa
Baja cabbage
Snapper, fish fillets, tri-tip, shrimp, roasted chicken or whatever meat you are serving
Warmed tortillas (wrap tortilla stack with lightly damp paper towels, then wrap with plastic wrap and warm in the microwave for about 1 minute, test and warm a little more if you need to)
Garnish with some lemon or lime wedges and cilantro

This is "clean food". You will feel good inside after you eat it and your body will thank you. You don't have to make the pico salsa, you can buy it and the same with the guacamole~just buy it if you are crunched for time. You can even buy a fully cooked chicken at the market, come home and warm some tortillas and you are ready to go! It's just that easy!


Cinnamon Rolls In A Snap!

Quick, Simple, Instant Gratification!


I made an Apricot Tart a few days ago. As you may or may not know, the Pepperidge Farms puff pastry comes with 2 separate sheets of dough. I had already used one sheet for the tart. The other one was just hanging around and in the back of my mind~ I knew I needed to use it up. It's Sunday am and I'd like to give the fam a quick~nothing says loving like something from the oven treat. First thing, I turned the oven on to 375 degrees. I grabbed the said puff pastry, some cinnamon, sugar, butter & toasted, sliced almonds. I unrolled the puff pastry, lightly spread room temperature butter over the dough. A light sprinkling of sugar and cinnamon and then a scattering of almonds. Rolled it up~tightly. Grabbed my cookie sheet, plopped a Silpat liner on it. I sliced up the puff pastry roll into 1 inch slices. This gave me 12 pieces. I spread them out on the sheet, slid them into the oven and in about 15 minutes, I had wonder of wonders, cookie size cinnamon rolls with caramelized bottoms (from the sugar). Delightful! Just to top it off, I placed 1/2 cup powdered sugar, 2 tablespoons room temp. butter, 1/2 teaspoon vanilla and 1-2 tablespoons cream into a small bowl, whisked it up and spread it lightly upon the toasty surface of the cooling rolls. When you bite into these treats, they are crispy, light, delicately flavored treats. You won't feel like you have a stone in your tummy afterwards. Well unless you ate them all!

Saturday, July 10, 2010

British Invasion

Vivienne Westwood's Pillow for The Rug Company

It's faded glory is smart looking so it is no wonder designers have embraced it as a "must have"

~The rug version~
(I know just the place for this~bring it right over here!)

Contempory, yet classic

~as a painted, lacquered dresser~
Even the family pooch is getting in on the bandwagon!

Friday, July 9, 2010

Light Fantastic

We Trip To Light Fantastic.....
Thomas Edison probably never suspected lighting would become so avant garde. It's fun to explore the creative expressions meant to illuminate our dwellings in such an untraditional manner.


Intricate Cut-outs
Beaconing Lamps ~ shining into the darkness.


Unusual shapes and striking textures.


Lights like gems ~ dangling from our ceilings.


Whimsy~nothing too serious~meant to cast silhouettes across the night


Monday, July 5, 2010

Apricot Jam

~Apricot Jam~

Soon the dilemma of what to do with all these apricots will be over. These seasonal stone fruit with velvety skin and a soft, fleshy, sweet interior has kept me on my toes to make sure they don't go to waste. My solution now is to can some jam. I researched recipes and decided that a variation of David Liebovitz's would be best. There isn't much pectin in apricots so, I am using liquid fruit pectin to make sure the jam sets well.


~Finished Product~

7 cups fresh apricot chunky puree (I removed the skin by blanching the apricots in boiling water for a couple of minutes and dropping them into a cold water bath~the skin slides off~beware not to overcook though or you will have mush)
6 cups granulated sugar~ use more or less than this depending upon the sweetness of your fruit
7 tablespoons fresh lemon juice
1-3 ounce packet of liquid pectin~made by Ball
12-half pint canning jars

Note: you could make 1/2 or 1/4 of this recipe and store in the fridge if you don't want to do the full-on canning process. I did follow the USDA canning guidelines which can be found online.

1. Place the skinned apricots in the work bowl of a food processor. Pulse into a rough chop. Pour into a large stockpot or canning pot. Continue until all the apricots are chopped.

2. Add the remaining ingredients. Cover the pot and cook until the apricots come to a rolling boil. At this point make sure your heat is no higher than medium-high so the contents at the bottom of the pan do not burn. Stir occasionally. Cook, uncovered~skimming any foam that rises to the top to ensure the jam is clear. After a period of time, the jam will begin to thicken and reduce down. The color will darken, and when the jam is at 220, drop a dab of jam on a small plate and place in the freezer for a few minutes. Now check to see if your jam has thickened to the right consistency, if not continue to cook it until you have the results you are seeking. At this point, I added a split vanilla bean to my jam.

3. Remove from heat and package or store in containers. Follow USDA canning guidelines or place in containers to refrigerate.

~Every summer canning was a part of our family life. Peaches were probably our family favorite. It is always comforting to hear the ping from the jam jars as they cool, letting me know they are sealed properly. We use lots of apricot jam throughout the year. It makes a great base to dip egg rolls into. By just adding a small amount of Asian sesame oil and soy sauce to the apricot jam you have a lovely dipping sauce. A jar could also be reheated with finely diced jalapeno pepper and then cooled and poured over a block of cream cheese for a treat to eat with Wheat Thins or favorite crackers.~

Sunday, July 4, 2010

Favorite Chocolate Chip Cookie Recipe

Chocolate Chip Cookies

There is much to be said about the "definitive" chocolate chip cookie. It is after all a matter of personal preference, and that is based largely on evolving taste experiences. Our family has enjoyed this version of chocolate chip cookies since Martha Stewart published her first book in 1982. I grabbed my first edition, dog-eared copy of "Entertaining" and made up a batch of these cookies~just as I have done for 28 years now~every 4th of July. It's tradition. You may ask what separates these from Toll House and every other recipe out there and my answer would be~personal preference. It's got flavor (buttery~caramel~salt tinged~right mix of chocolate) and texture (chewy with crispy edges and soft centers) and what it lacks in appearance, it more than makes up for in all the above categories. It doesn't require grinding up oatmeal, or finding 3 types of rare chocolate or unusual baking techniques. It's easy! So we just love these cookies, and you just might too!

RECIPE

We have slightly changed this recipe from the original~Alexis Brown Sugar Chocolate Chip Cookies~Page 93 in "Entertaining" by Martha Stewart.
2 sticks butter
1-1/2 cups light brown sugar, packed
1/2 cup granulated sugar
2 eggs
1 teaspoon real vanilla
1-3/4 cups flour plus 1 tablespoon (just this little bit added makes a difference)
3/4 teaspoon salt (I like Kosher or sea salt~it has a cleaner flavor)
1 teaspoon baking soda
12 ounces "mini" chocolate chips

{When scooping flour, aerate the flour by fluffing with a butter knife or fork. Now dip your measuring cup in and level it off with the straight edge of a butter knife. This way your flour will measure more accurately.}

To begin:
Cream the butter and sugars. Add the eggs and vanilla. Combine well. Mix the flour, baking soda, and salt in a separate bowl. I use a whisk to mix the dry ingredients before adding them to the wet ingredients~now combine the dry and wet~mix. Add chocolate chips and mix again. At this point you can begin making your cookies, but they will be on the flatter side, or refrigerate for a few hours so the cold dough will hold it's shape a little better when baked. Bake in a 350 degree oven for 8 minutes, or until the cookies are golden in color. Remove from oven, cool a few minutes before removing them onto cooling racks.
If you make some, tell me how you liked them. This recipe makes about 5 dozen cookies.

Drop by 1-inch scoop
I use Silpat's for most of my baking. It's green and easy to use. No parchment or foil to mess with. If you have 2-3 of these, it makes easy work of baking cookies. Now if you don't own Silpats or have the means to, then use the standard methods of parchment or greased lined cookie sheets, or foil for easy clean-up.

No~I'll admit these are not beauties~oh, but beware, they just might capture your taste buds as they did us.
(Cookies are shown in one of Martha's original copper trays she used to sell in her newsletter~pre-Martha Stewart Living.

Happy Fourth of July

We celebrate our declaration of independence today.
We have parades, picnics, family outings, and freedom because of the heroes who founded our country.
Here's a nod to just a few of the men we owe appreciation to for all their sacrifice and hard work in our humble beginnings

A picture depicting one of the most amazing military feats George Washington led~to our eventual victory!

Thank you George Washington!

Thank you John Adams and by the way how amazing that our second and third presidents died on the same day on the 4th of July.

Thomas Jefferson, self-sacrificing for the future of all Americans.

Benjamin Franklin

Our flag still flys freely!
We celebrate with meaning the glorious 4th of July